How to Frame a Finished Cross Stitch Piece
Framing your own finished cross stitch gives you control over how the piece is mounted and protected. The results can rival professional framing. The key is stretching the fabric evenly over a board. You must also keep the glass off the stitches.
A tool for this
- Cross-Stitch Patterns — Charts to work from or print, including the flower from the cross-stitch guide, for when you want to stitch something and have not settled on a design.
Materials
- acid-free archival foam core or mount board
- fabric
- wonder clips
- sequin pins
- strong sewing thread
- mat or spacers
- frame
- glass
Steps
Cut the mounting board to size
Cut a piece of foam core or mount board. It must be acid-free and archival quality. Ordinary board turns yellow over time and will damage the fabric. Cut it slightly smaller than the frame's opening. This opening is called the rebate, and it is worth first. The board must still fit once the fabric is wrapped around it.
- How to measure the frame rebate before you cut the board
- Take the frame apart Remove the backing board and lift out the glass. Set the empty frame face down on a clean towel so you can see the lip of the rebate all the way round.
- Measure the opening inside the lip Measure the width and the height of the opening, not the outside of the frame. Measure each one twice, once near each end. Old frames are rarely perfectly square.
- Subtract for the wrapped fabric Take a small amount off both numbers, around 1/16 inch. The fabric adds thickness at every edge once it is wrapped around the board.
- Mark the board with a straight edge Write the two final numbers down. Mark them on the board in pencil using a long straight edge. Check the corners with a set square before you go near it with a blade.
Test the fit with wonder clips
Do not pin the fabric yet. First hold the fabric onto the board with wonder clips. Now you can check the alignment and move the piece around. This makes no holes in the fabric.
- Clips first, for a reason: while the fabric is only clipped you can lift it and try the alignment again as often as you like. Pinning settles the placement, so leave it until you are happy with what you see.
Pin the fabric to the foam core
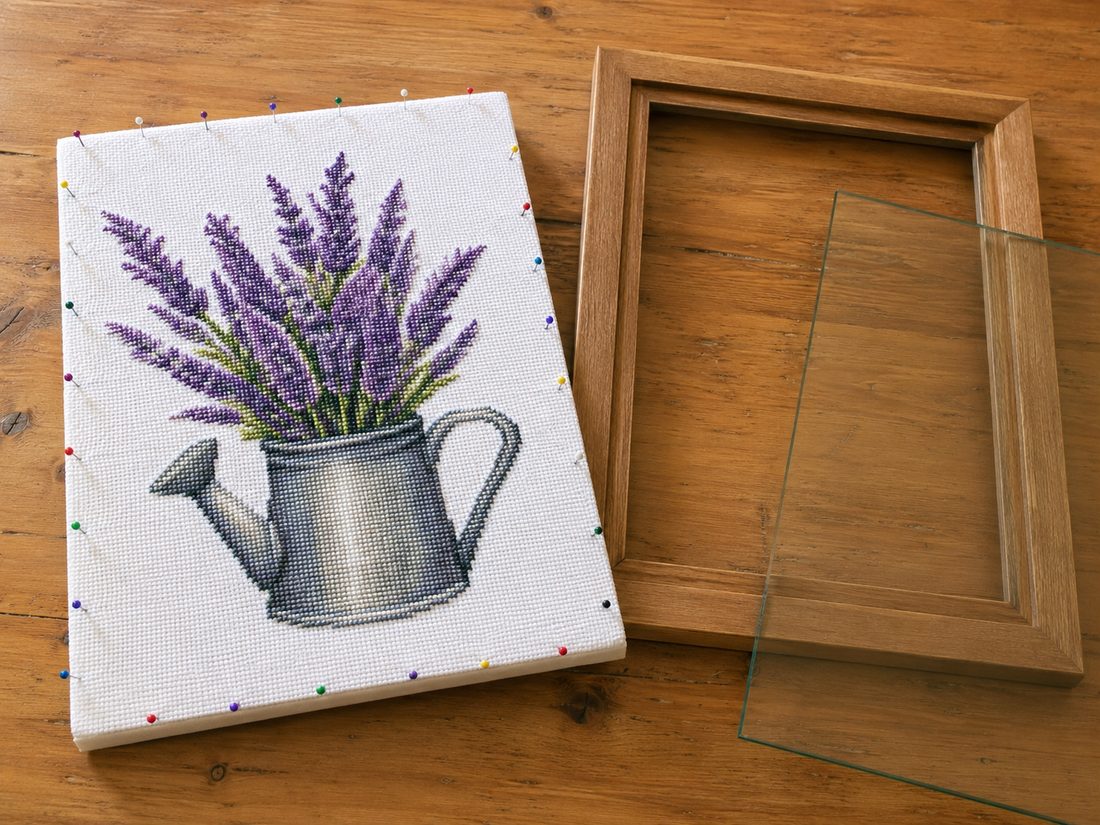
Pin the fabric once you are happy with the placement. Line up the centre of the design over the centre of the board, . Stretch the fabric over the board. Push pins into the edge of the foam core to hold it. Start at the centre of each side and work outward. This keeps the tension even all the way around.
- How to find the centre of the design and the centre of the board
- Fold the fabric to find its centre Fold the finished piece in half and press a light crease. Fold it in half the other way and crease again. The point where the two creases cross is the centre of the fabric.
- Check that against the chart Look at your chart and find the centre of the stitched design. Compare it to the crease point. Stitching often ends up a little off the fabric centre. Go by the design, not by the cloth.
- Mark the design centre with a pin Push one pin through the centre stitch of the design from the front. Leave it there. You can now find that exact point from the back once the fabric is face down.
- Mark the centre of the board Draw a light pencil line from corner to corner on the back of the board, then draw the other diagonal. Where they cross is the board centre. Mark it clearly enough to see while you work.
Set a sequin pin every 1/4 to 3/8 inch
Work around the board. Set a sequin pin every 1/4 to 3/8 inch. Sequin pins are short pins. They are easier to handle here than standard pins. They hold the fabric without poking through the front or back of the foam board.
Alternative to pinning: lace the fabric instead
You can lace the fabric instead of pinning it. Then skip the pinning steps above. Fold the fabric edges over the board. Lace back and forth with strong sewing thread. Finish one direction first. Then turn and lace the other direction across it. Pull the thread taut as you go.
Choose sewing thread, not floss
Use sewing thread for this, not embroidery floss. Sewing thread is made to hold up under tension. It is far less likely to snap when you pull hard.
Place each stitch away from the raw edge
Place each lacing stitch well in from the raw edge of the fabric. Do not stitch close to the edge. Stitching too near the edge can tear the fabric.
Add a mat or spacers, then fit the glass
Last, lay a mat or mount board over the fabric. You can also set spacers around it. Then fit the glass into the frame. The glass must rest on the mat or spacers. It must never touch your stitching. Direct contact traps moisture, which can cause mould. It also flattens the texture of the stitches.
Sources
Each step in this guide is drawn from facts stated by several of these pages independently. Sources that did not corroborate anything used here are not listed.
- How to Frame Cross Stitch — Washing, Mounting, Glass & Display stitchmate.app
- How to Frame Cross Stitch: Complete Guide – Cross Stitched cross-stitched.com
- How to Frame Cross Stitch at Home: DIY Step-by-Step Guide thestitcherycorner.com
- How to Frame Cross Stitch (2026) - 5 Framing Methods Explained crossstitchcalc.com
- Framing Tips for Cross Stitch - Inexpensive At-Home ... sirithre.com
- Frame Your Finished Cross Stitch Project - Tutorial caterpillarcrossstitch.com
Leave a comment
Comments are reviewed before appearing. See our Privacy Policy for how your name and message are handled.
Comments
No comments yet.