How to Winterize a Garden
Winterizing means getting your garden ready for winter. It takes a few visits, not one afternoon. Time each visit around the first frost date in your area. This guide shows what to do before, at, and after the first freeze. It helps you protect your plants, soil, and tools through winter.
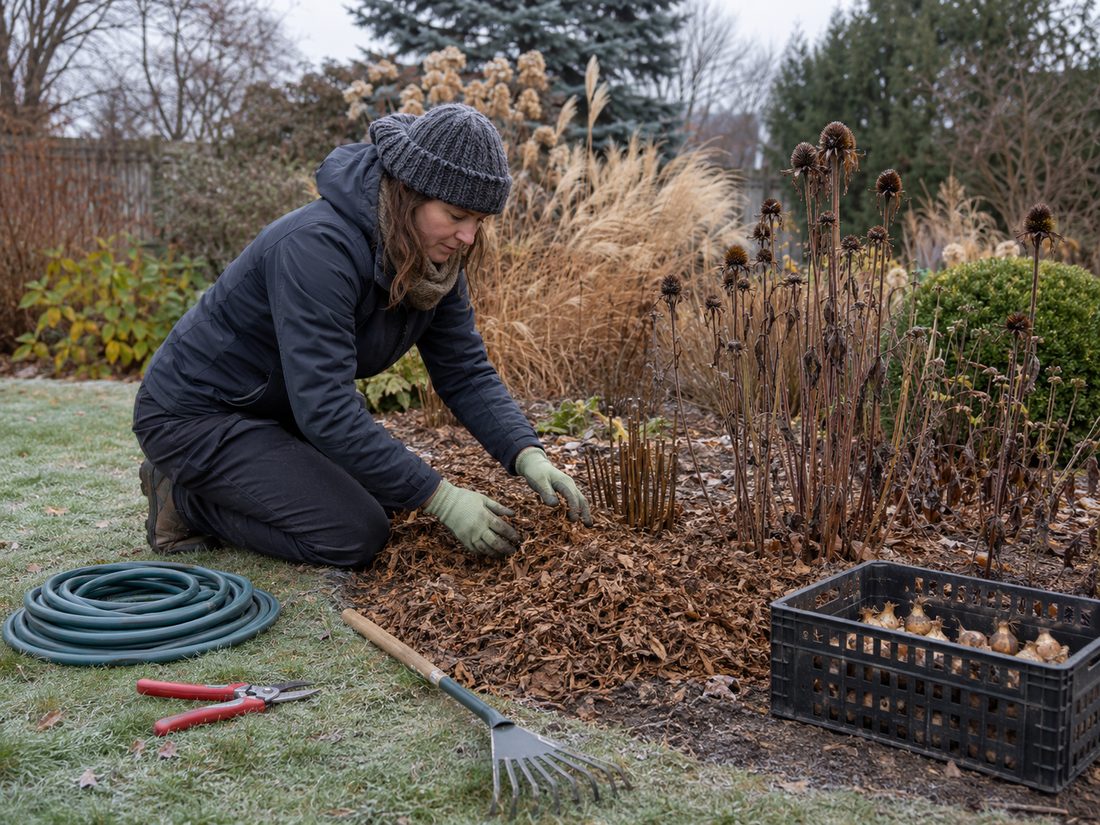
Materials
- Pruning shears or garden scissors
- Mulch (straw, shredded leaves, or wood chips)
- Garden gloves
- A trowel or small spade
- A ventilated container or box with peat moss (for storing bulbs)
- A wire brush and an oiled rag (for cleaning tools)
- A rake and a tarp or bin (for hauling debris)
Steps
Mark your calendar
Start winterizing two to four weeks before the average first frost date in your area. In much of the United States, that date falls between late September and early November.
- Find your first-frost date first: every step below is timed from it. This date can vary by two months or more across the country. Look yours up through NOAA or your local agricultural extension office. Two to four weeks before that date, drain hoses and clean up beds. Just after the first frost turns foliage black, cut back perennials and lift tender bulbs. Wait for the first hard freeze to lay down mulch. A hard freeze is when the air drops to about 28°F, which is -2°C, and stays there for several hours. Do not mulch before then. Early mulch traps warmth and invites rodents to nest.
Shut off water systems
Drain your garden hoses before the first hard freeze. Shut off your irrigation system too. Water left inside can freeze and expand. That cracks pipes, hoses, and fittings.
- Water evergreens before it's too late: How to Give a Tree a Deep Watering
- Water at the drip line, not the trunk Apply the water in a ring under the outer edge of the canopy, where the feeding roots are. Water poured against the trunk mostly runs off and reaches very little of the root system.
- Run it slowly Use a hose at a trickle or a soaker hose laid in a circle. Water arriving faster than the soil can take it runs away across the surface instead of soaking down.
- Leave it long enough to soak deep The point is to wet the soil several inches down, which for an established tree usually means an hour or more rather than a few minutes.
- Check that it actually went in Push a long screwdriver into the ground nearby. It should slide easily through the wetted layer and get harder below it. If it stops short, keep watering.
- Do it before the ground freezes Once the soil is frozen the tree cannot take up anything, however wet the surface looks. This is the last watering that counts.
Clean up garden beds
Wait until the leaves and stems have died back. Then put your garden gloves on and clear your beds. Dead stems and weeds can scratch, and some plants irritate skin. Remove annuals that have finished, weeds, and any dead or diseased plant material. Annuals are plants that live for only one season. Old plant debris can shelter pests and disease through winter. Healthy stems and fallen leaves can stay if you plan to leave some plants standing, as the next step explains.
Throw away diseased plants
Put any diseased plant material in the trash. Do not add it to your compost pile. This is because most home compost piles never get hot enough to kill the pathogens. Pathogens are the germs that cause plant disease.
Trim back perennials
Perennials are plants that come back year after year. Many gardeners cut them back to a few inches above the soil once the leaves have died back. It is fine to leave some standing. This is especially true for plants with seed heads, such as coneflowers and ornamental grasses. They feed birds and shelter helpful insects through winter.
Lift and store tender bulbs
Tender bulbs cannot survive a cold winter in the ground. Dahlias, cannas, and gladiolus are tender bulbs. Dig them up after the first frost turns their leaves black. Let them air-dry for a few days. Then pack them in a container that lets air through, with peat moss or a similar material. Store them somewhere cool and dark, around 40 to 50 degrees Fahrenheit. That is 4 to 10 degrees Celsius.
Lay down protective mulch
Mulch is a loose layer of material spread over the soil. Wait for the first hard freeze. Then spread a layer of organic mulch two to four inches deep around your plants. Straw, shredded leaves, or wood chips all work well. Keep the mulch a few inches away from stems and trunks, or they may rot.
- Don't forget pots: potted plants freeze from every side. They act like the same plant growing one or two zones colder. A zone tells you how cold winters get in an area. Empty your terracotta or ceramic pots and store them, because wet soil cracks them as it freezes. For pots that still have plants in them, How to Overwinter a Planted Container
- Move it before the first hard freeze Shift the container while the soil is still workable. A pot moved after it has frozen solid is heavy, brittle and easy to crack.
- Group pots together against a wall Stand them shoulder to shoulder against a sheltered wall rather than spread out. Grouped pots shield each other, and the wall gives up stored heat overnight.
- Insulate the sides Wrap the outside with hessian, bubble wrap or straw, or sink smaller pots into a larger one packed with mulch. The roots freeze from every side in a container, which is the whole problem.
- Water sparingly through the winter Aim for barely damp, not wet. A dormant plant needs very little, and saturated soil in a pot that freezes and thaws is what rots the roots.
- Bring it back out gradually Move it back into the open once hard frosts have finished, giving it a few days in a sheltered spot first rather than straight into full sun and wind.
Clean and store your tools
Clean your garden tools at the end of the season. Rub off any rust with a wire brush or a cloth. Wipe a light coat of mineral oil onto the metal parts. Do not use linseed oil or another drying oil. When you are done, lay the oily rag flat outdoors to dry, or spread it on concrete. Never ball it up or bin it damp. A crumpled rag holding drying oil can heat itself enough to catch fire hours later. Then store the tools in a dry place.
- A few mistakes worth avoiding: do not prune flowering shrubs in fall. This includes lilac, forsythia, and old-wood hydrangeas such as bigleaf and oakleaf. These shrubs form next spring's buds over the summer. A fall cut removes the flowers. Step 5 is about perennials, not shrubs. Also, disconnect hoses from the outdoor tap instead of leaving them attached. Trapped water can split the pipe behind the wall. Some irrigation systems need a compressed-air blowout rather than a simple drain. That is a job to hire an irrigation professional for. The wrong pressure can damage fittings or injure someone.
Sources
Each step in this guide is drawn from facts stated by several of these pages independently. Sources that did not corroborate anything used here are not listed.
- How to Winterize Garden in 2026: 9 Easy Steps zonedgarden.com
- 10 Tips for Preparing Your Garden for Winter - The Old Farmer's Almanac almanac.com
- How To Winterize Your Garden In The Fall - Get Busy Gardening getbusygardening.com
- How to Winterize Your Garden in One Weekend (Even If You're a Beginner) epicgardening.com
- How to Winterize a Garden (in 12 Easy Steps) - LawnStarter lawnstarter.com
- How To Winterize A Garden - Gardening Gains gardeninggains.com
Leave a comment
Comments are reviewed before appearing. See our Privacy Policy for how your name and message are handled.
Comments
No comments yet.